
Object

Our post today is looking at the treatment of a chalkboard from Beamish Museum, which has been used in their schoolrooms.
The schoolrooms at Beamish tend to be used on a regular basis to show school groups what life was like for children in a Victorian classroom and as Beamish is a living museum the majority of objects on display also tend to be used in order to demonstrate aspects of working and everyday life to visitors.
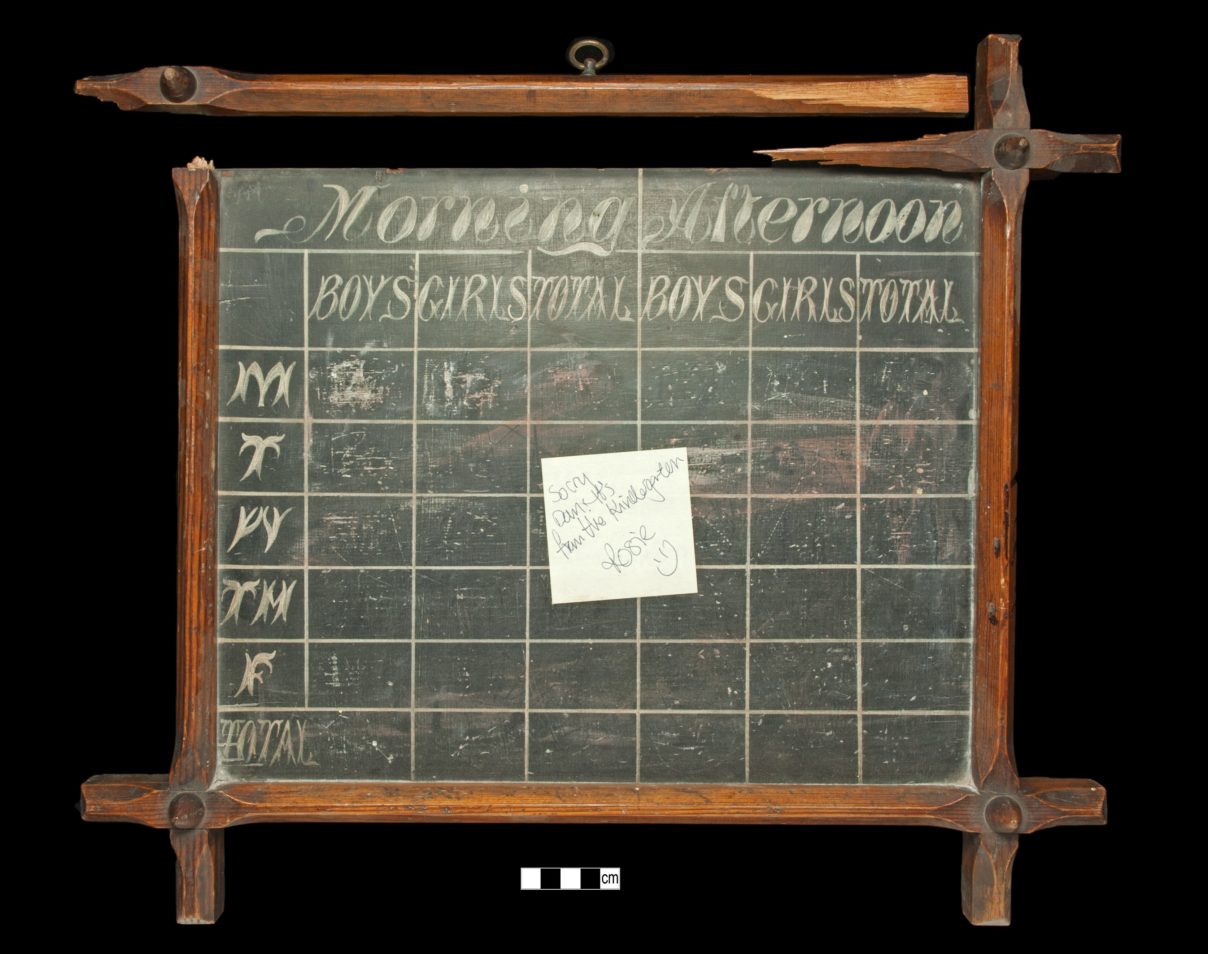
This particular blackboard appears to be recording the attendance of the pupils throughout the week. It also looks to be recording the attendance of boys and girls separately and checking their attendance in the morning and afternoon rather than the full day.

Condition
- Damage to frame with upper strut being completely detached.
- The wooden frame was fragile and friable in places.
- The top left corner of the frame was missing the verticle bevelled edge.
- There was damage to the horizontal bevelled edge on the left side.
- Evidence of cracking in the black surface paint.
- Areas of missing black surface paint and damage to the frame underneath.
- Surface staining and chalk residue on the surface of the object, especially on the black surface paint.
Conservation
Blackboard Surface
The surface of the blackboard was cleaned with a solvent solution appropriate for both the black and white paint on the surface, which would not damage or remove it. This was applied carefully using a microfiber cloth in order to remove surface dirt and chalk residue. The same cleaning solution was applied with cotton wool swabs on areas of thick chalk residue. A final clean of the surface was performed in order to ensure a non-streaky finish.
Additional cleaning of the white paint on the front of the blackboard was attempted using an alternative solvent solution in order to try and remove further ingrained dirt, however it was found that this began to remove the white paint and so no further attempts were made.
The cracking black paint was consolidated using a water based adhesive in order to stabilise and strengthen the bond between the paint and the wooden frame without causing damage. The blackboard was held in the proper place within the frame with clamps while the consolidant cured. A water based consolidant was chosen as it would be able to be reversed and removed if necessary and wouldn’t damage the original materials.
On the areas of the blackboard surface where the paint had been worn down, revealing the wood underneath, the bare wood was consolidated with an appropriate consolidant and the areas were then filled with Rustins Quick Dry Blackboard Paint. The blackboard paint was Oddy tested and passed the test for permanent use in regard to all the metal coupons.
On the reverse of the blackboard, the gap between the edges of the blackboard and the frame were filled using a combination of an acrylic copolymer, glass microballoons and a mixture of pigments in order to increase strength and stability and minimise obtrusiveness. The edges of the frame and blackboard were taped off with blue tape and then the mixture was applied with a thin spatula into the gaps and built up until it was just proud of the blackboard surface. Once partially dry the gap fill was smoothed down using an appropriate solvent.
Wooden Frame

The wooden frame was first dry cleaned using a Staedtler handheld eraser in order to remove any surface dirt and help to determine what other treatments would be needed.Solvent cleaning wasn’t required as the condition of the wood overall was good and there wasn’t evidence of ingrained dirt or staining.
The metal components of the blackboard, the brass ring and the iron nails, were cleaned with cotton wool swabs and a solvent appropriate for metals. This removed sufficient surface dirt from the surface but didn’t remove any of the natural tarnish. They were then consolidated with an acrylic copolymer solvent in order to protect them from corrosion.
The left nail on the detached upper strut of the frame was manipulated manually back into shape so it would fit into its corresponding hole on the top of the blackboard for the reattachment of the strut. The right nail could not be manipulated in a way which would allow the fractured edge of the strut to be realigned and so it was removed and retained in a small finds bag.
The lose side struts were adhered to the blackboard using an appropriate adhesive for wooden material and the frame was held together using clamps in order to ensure a strong bond was formed between the detached fragments and the frame while the adhesive cured.
The fractured areas on the upper strut, which were able to be adhered together, were first consolidated using a water based consolidant in order to provide additional strength and support. They were then adhered back together using an acrylic copolymer to provide additional strength and support to the frame overall.
As there was an area of missing surface material on the chalkboard, a replica of this area was made to replace the missing section. The replica section was made from a piece of aged pine wood, which would provide a similar wood grain to the original pine frame. The use of an aged piece of wood was preferred as it would have off-gassed making it less of a source of VOCs, which could damage other objects. The replica piece was color matched to the frame using a combination of Littlefair’s Environmentally Friendly Water Based Wood Stain & Dye in Golden Pine, Rustins Wood Dye in Brown Mahogany, and Colours Exterior Woodstain Satin in Deep Mahogany. All of the woodstains were Oddy tested and passed the test for permanent use in regard to all the metal coupons. After being color matched, the replica piece was coated with Renaissance micro-crystalline wax polish. The completed replica piece was adhered in place using a suitable acrylic copolymer adhesive.
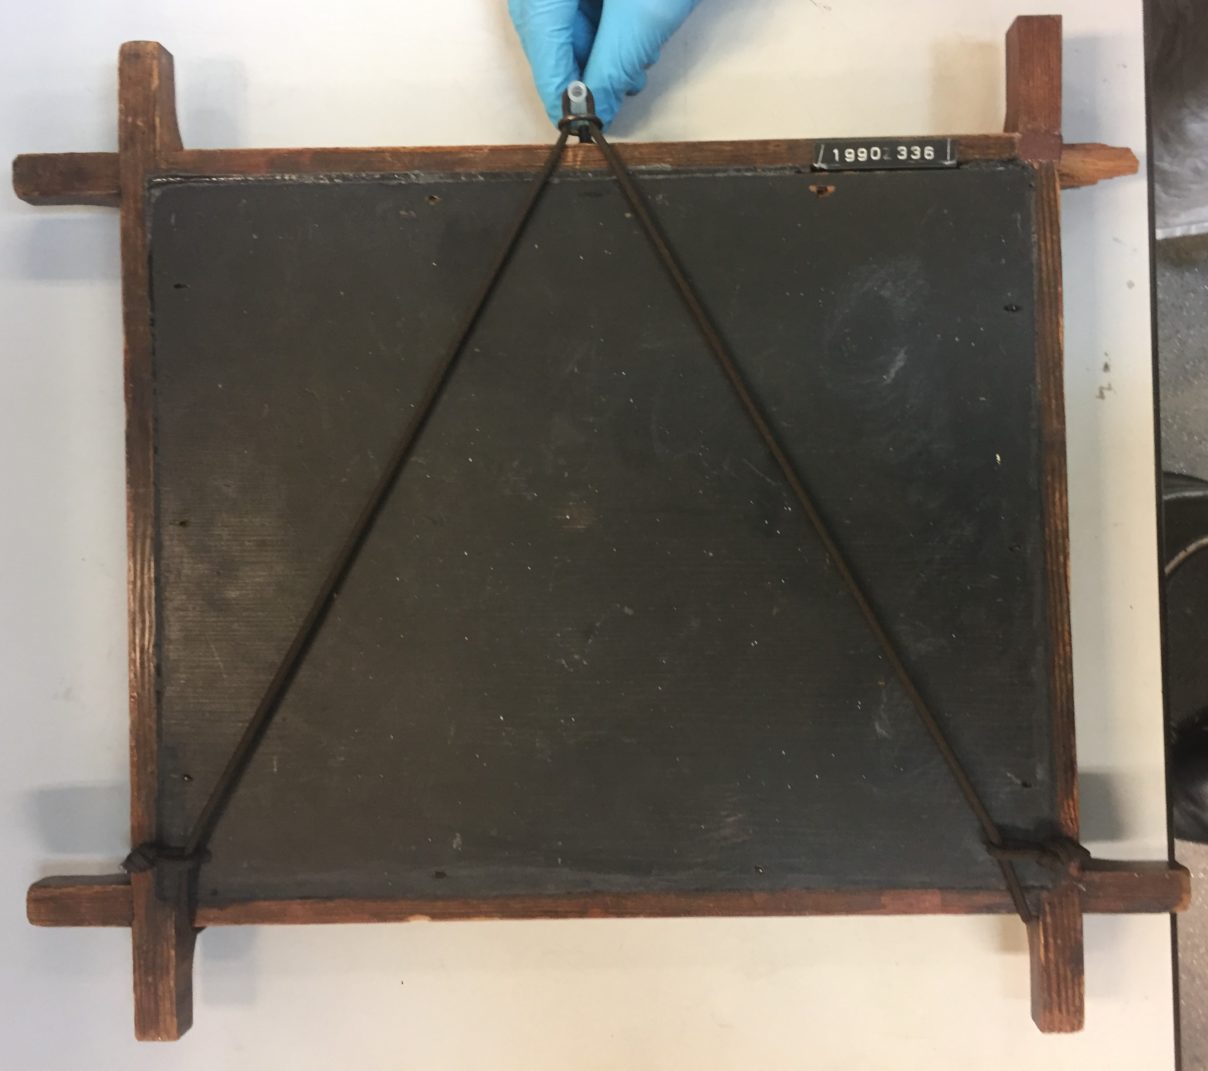
As the blackboard was required for display, it was decided that a display support would be created for the blackboard using 4mm Braided Polypropylene Rope Cord. This would enable the object to be hung in the classroom again and continue to be used, but would remove the strain from the brass ring and wooden frame, which is suspected to have been the cause of damage in the first place. The rope was tied securely and then looped around both the horizontal and vertical beveled edges on the two bottom corners of the frame and up through the brass ring.