November ’19
November’s Object of the Month is an 1880’s catheter set from Beamish Museum.

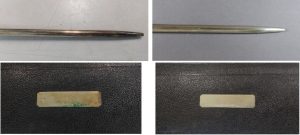
The object to be conserved was a nineteenth century surgical kit used for urethral catheterisation employing the Holt’s Stricture dilation method. This particular set includes a box, six tools, and an old paper label. The box has a lid and base and the tools inside consist of four cannulas, one dilator, and one guiding rod. The set is a typical example of a surgical kit from the late 1800s, and has similar features to comparative examples; ivory handles, faux leather, lid plate, pile/satin fabrics, etc. It is one of several comparative kits kept at Beamish Museum, which had been stored together in a polyethylene container.
Conservation

Dry cleaning was used as an initial approach to the object as it was less hazardous than introducing solvents. A soft brush was brushed over the ivory handles to remove surface dirt followed by a covered Museum Vac to remove particles as it was the only effective method tested. A soft brush and Museum Vac were also used to remove surface dirt on the faux leather and textile as all other methods damaged the surface. Finally, to remove dirt from the surface of the paper label, akapad Classic was used as the open cell structure was incredibly effective at trapping dirt.

To remove general surface dirt from the metal components of the object, wet cleaning was employed. A solution of 50:50 ethanol and deionised water with three drops of Synperonic A7 was rolled over the surface via cotton swabs. The metals were then swabbed with 50:50 ethanol/deionised water to ensure the surfactant had been removed. As the metal components also showed evidence of tarnish and corrosion, further cleaning was required. A solution of glass microballoons in ethanol was applied to the metal surfaces using cotton swabs, which successfully removed all tarnish and corrosion.
The dilator required a slightly different treatment as it was ferrous unlike the other tools, and so the corrosion products on the surface were different. As a result, cotton wool poultices of ethanol were applied to soften the corrosion followed by removal using wooden tools as they did not scratch the surface. The needs of the dilator were the primary consideration for choosing a coating as it was the most at risk of deterioration. Renaissance wax was chosen as it could be applied as a solid, which made it more controllable, was “self-healing” if scratched because of its low glass transition temperature, could be used on all metals, and it maintained a more accurate appearance of the metals. The wax was applied cold with a microfiber cloth in three layers to ensure all of the metal was fully coated .
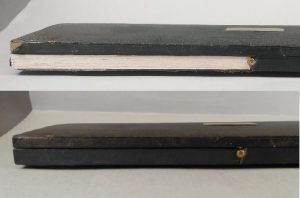
When initially examined, it was clear that several areas of the original wood layer had become detached and lost over the years. As a result, the decision was made to fill these areas and make the object appear more aesthetically uniform. Balsa wood was chosen as it is similar to the original material, and is easy to carve and shape to fit then missing areas.
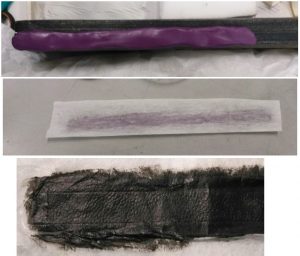
The decision was then made to replicate the missing faux leather fills, which would be attached to the wooden fills. To create the fill, a silicone putty was chosen as it could achieve a high definition of decoration with minimal mess. This putty was applied to the surface of the original faux leather to create a mould. Once fully cured, the mould was removed and L2 Japanese tissue was tamped into it after being wetted with 10% Klucel G in deionised water. The fill was allowed to cure for a day before being colour-matched to the original faux leather. All fills and areas of replication were then adhered using neutral pH adhesive.

Stay tuned for next month’s object!