
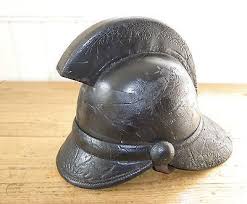
We’ve dug into the archives for today’s post, which features a leather fireman’s helmet from the collections at Beamish Museum, and was treated in the summer of 2011.
Object

A leather fireman’s helmet in several pieces and incomplete. It was made by James Hendry Ltd of Glasgow c.1938. It’s dark brown colour with vestiges of a lacquer or varnish on the outer surface of the leather. There are a number of tarnished brass fittings, with what appears to be the remains of a cleaning product on the surface. There is a swastika symbol painted onto the side of the helmet, which will have occurred at some point in its history, presumably after it ceased to be used as a fireman’s helmet and probably post-World War II.
The firefighter’s helmet was originally developed to protect the firefighter’s head from objects or debris falling from above. The wide rear bill of the helmet was designed to prevent hot water and hot embers from reaching the firefighter’s neck or falling down the inside their coat.
Condition
- The object was in four pieces
- Evidence of dirt and dust on the surface of the obejct
- Signs of mould growth on the surface
- Residual cleaning product on the brass fittings
- Evidence of tarnish on the brass fittings
- Signs of warping of the leather, which was also incredibly stiff.
Conservation
The leather helmet pieces were initially surface cleaned using a Tonovac 99 vacuum in order to remove loose dust, dirt and mould. They were then cleaned using smokesponge in order to remove the more stubborn dirt. Other dry cleaning methods were tested but were found to be too aggressive. The areas with mould were treated using ethanol.
Dirt and residual cleaning product was removed from around the brass fittings using groomstick on the end of a dental pick. This was able to remove the dirt and residue safely from the crevices around the fittings.
In order to try and reshape the helmet so it could be reassembled, the pieces were placed into a humidification chamber with a hair hygrometer to monitor the RH levels. A balloon was inflated inside the helmet to support the object in its warped shape. The chamber achieved an RH of ~75% within a few hours.
After 7 days in the humidity chamber, small specks of mould were noted on three of the components. The mould was removed from these areas and treated with ethanol. The strip component of the helmet showed no mould growth and humidification had successfully allowed it to be uncurled into its original form. It was then dressed on the outer surface with Pliantine and sealed in a polyethylene bag to prevent it drying out before it could be attached to the rest of the helmet.

After a further four days in the humidification chamber mould growth extensively covered all three remaining components, which were again removed and treated with ethanol. To prevent re-growth, a beaker of ethanol was then placed inside the chamber with the objects and allowed to evaporate into the humidified environment. From this point on mould growth did not re-occur.
Humidification proved successful for the two smaller components after 4 weeks in the chamber, however while the main part of the helmet relaxed a little, it was still too stiff to be re-shaped. This piece was placed on a mannequin head and the two halves were stitched (using existing holes) to encourage the halves together as far as possible.
It was decided to test how effective and/or destructive it would be to apply liquid water to the dry leather. A piece of desiccated scrap leather was measured and drawn, then immersed in water until saturated. It was then unfolded and flattened under firm restraints, and allowed to air dry overnight. This was drawn and measured again and the amount of shrinkage calculated at approximately 7%. The object being significantly thicker than the test piece, it was considered that direct application of liquid water to the object could be done with minimal risk of shrinkage. For further control, the water was applied through a contact medium rather than by full immersion.
Medical dressings were applied to the surface of the helmet and secured in place with crepe bandages. Water was applied to wet the bandages and the object was covered with polythene to slow their drying; the bandages were moistened periodically during the day.
The bandages were removed from the helmet and force was applied by hand to re-shape the brass fittings on the peak, allowing further re-shaping of the leather parts. The stitching was tightened to draw the halves together fully, and the helmet was placed on a sandbag, with bandages around it holding it in shape. Thus restrained, the helmet was allowed to dry slowly under a Tyvek tent overnight.

Pliantine leather dressing was applied to the outer surface of the helmet to give some protection and a consistent colour. The neck-guard was affixed with Lascaux 498 on points of contact, but because the warp in the object had not been entirely corrected, it was not possible to replace the component exactly. For this reason, no repair of the broken eyes on the end pieces was attempted, as they could not be used to hold the piece in place.
Some leather was acquired for replicating missing pieces of the helmet, namely the crest piece and chin-straps. Replacement chin-straps were cut according to the dimensions suggested by the remaining pieces and the approximate size of an average head; these were dyed with a dark brown leather dye so they blended with the original leather, but were distinguishable on closer inspection. Holes were drilled and a brass buckle fitted, which was painted with acrylic paints to match the patinated surface of the original brass; this can be removed easily if it is ever decided to restore the brass to its original colour and finish. The straps were affixed directly to the remaining pieces of original strap with Lascaux 498 adhesive and held in place with padded bulldog clips while curing.
A replica crest piece was cut from new leather in two pieces with tabs for adhering together and to the helmet itself. The leather was coloured using the same leather dye as for the chin straps. This was then joined into one piece and gradually adhered to the helmet with Lascaux 498. The final join of the replicated piece to the front piece required the use of Paraloid B72, as Lascaux did not give a strong enough bond on this narrow join. The crest piece hides all new stitching from view.